


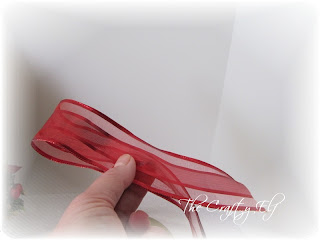
Time for the ribbon! Some people were wondering about the ribbon. Where was it going to go? Did it even need the ribbon? What, ribbon? Yes, yes and absolutely yes!
I think after looking at this post you will see how the ribbon not only adds to the tree but how it gives the tree that extra bit of shape it needed.
What I'm going to share first is the bow for the top part of the tree. Because this is a very small tree I will need to adjust the size of the bows to accommodate.
I will being with a three looped bow.


Following the pattern, I will place the bow at the top of the tree

It is important to place the bow right into to the tree.

Now that the bow is where I want it, it is secured by a wire

I will use carefully adjust the tails of the bow to add shape to the tree.

Here you will see the bow has been placed so that it adds dimension, shape and that extra element to the tree


Here you can see how I have added the bow and how I use the tails and loop itself to add shape to the tree. It is important to remember to place that bow into the tree. By that I mean 2 to 3 inches in from the end of the branch. You will also notice how the one looped bow creates the appearance of a regular bow although it only has one loop. This style of bow is perfect for smaller projects

Backing the picture up a bit, you can see how it adds shape and fits right into the tree perfectly

I will continue to add the remainder of the bows


I think after looking at this post you will see how the ribbon not only adds to the tree but how it gives the tree that extra bit of shape it needed.
What I'm going to share first is the bow for the top part of the tree. Because this is a very small tree I will need to adjust the size of the bows to accommodate.
I will being with a three looped bow.

I'll make my first loop holding the ribbon where I want the first loop to be. You will see about 4" of ribbon for the first tail of the bow

Pinch the ribbon where the first loop will be and then twist the ribbon (the piece that is touching the pointer finger or, looking at the loop, the bottom piece of ribbon) clockwise so the top of the twisted piece of ribbon is now facing you. Before the twist the top of the ribbon (or good side of the ribbon) would have been facing out.

I will make a second loop

Twist the ribbon again. By twisting the ribbon you will always have the right side of the ribbon facing out.

I will make the third and final loop...... and twist

Taking a piece of wire approximately 4" long, I will carefully slide it under my thumb and on top of the ribbon/bow. I will bend the wire to the back and twist it to secure

I will cut the ribbon so that the second tail is slightly longer than the first.

Here is my bow

I will adjust the ribbon so that the tails are facing the front and the loops are where I want them to be

Following the pattern, I will place the bow at the top of the tree

It is important to place the bow right into to the tree.

Now that the bow is where I want it, it is secured by a wire

I will use carefully adjust the tails of the bow to add shape to the tree.

Here you will see the bow has been placed so that it adds dimension, shape and that extra element to the tree

For the other bows on the tree I will add a one looped bow. I will make it exactly as I did the first only this time, using one loop

I make the loop and secure with the wire as I did the bow above

Here you can see the bow is secured by the wire

I will cut the tail just slightly longer than the first

I will also twist the last tail cut so that the right side of the ribbon is facing up. I will continue adding these bows to the tree following the pattern

Here you can see how I have added the bow and how I use the tails and loop itself to add shape to the tree. It is important to remember to place that bow into the tree. By that I mean 2 to 3 inches in from the end of the branch. You will also notice how the one looped bow creates the appearance of a regular bow although it only has one loop. This style of bow is perfect for smaller projects

Backing the picture up a bit, you can see how it adds shape and fits right into the tree perfectly

I will continue to add the remainder of the bows

I have finished adding all the bows to the front of the tree

Moving to the back of the tree, I begin at the top and continue adding the bows and following the pattern

So here is the tree all decorated. It's time now to add the finishing touches on the bottom.
Wherever you are in you day I hope you are enjoying it
Wishing you many wonderful creations!


That is quite some tree now, I am dying to see what you will do with the base that is going to match all this decor that you have added!
ReplyDelete