


After this post only a couple things left to go!!
I'll be starting with the gold glittery branches

As mentioned in my previous post I'll be following a pattern, I will continue to do so with all the remaining ornaments. Having said that, do you remember the long gold glittery stem I cut? I'm going to use it now at the top of the tree. You can't ignore the top of the tree so here is where I begin to add some of the goodies.

I begin by sliding the long stem down into the tree keeping it close to the top branch. The top branch I'm referring to is the one that sticks straight up to the sky.

I continue to slide the stem down until I have it as far down as needed.

I then carefully place it up against the top branch and secure it with a wire.

I will now continue to add the remaining gold glittery branches to the rest of the tree.

One by one I will follow the pattern

Now that I've got all the branches attached to the tree

I will begin with the cherries. Remember the group of five? I'll start off with that one.

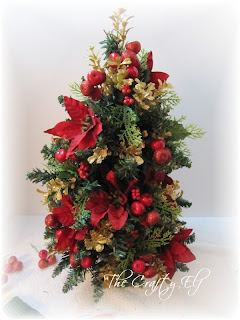
Can't ignore the top of the tree so that is exactly where I will put the group of five. I'm really pleased with how this is all coming together.
Again, following the pattern, I continue to add the remaining groups of cherries.

Turning the tree, I will make sure the back and the sides are all covered and I haven't missed any spots. It's always good to turn your project as your working to make sure you have everything evenly placed. I know I keep repeating myself but if you follow the pattern I promise you will never go wrong.

Now that I've got the entire tree covered and all the cherries have been attached, I will put the final ornaments on.

The pine cones.

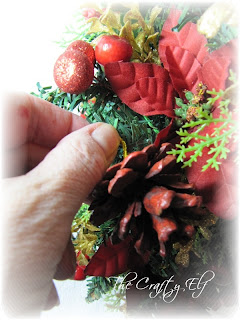
Today I want to show you how to add an ornament to your tree. The type of ornament that has a string or cord loop attached to it. Some people like to hang the ornament on the tree as it is, hanging it only by the loop but I have another way. Looking at the picture above, can you see how I have hung the ornament on the branch? It's just slightly over an inch - in from the end.

I will now place my thumb over the loop and holding the loop and the branch together making sure that the loop on the branch doesn't move
I begin to wrap the ornament around the branch clockwise while continuing to hold the loop in place.

Wrapping clockwise

When the ornament is tight against the branch, I continue to carefully turn it (if need be) so that the ornament ends up stitting on top of the branch.

See how nicely that sits there? Notice as well, you still see the end of the branch? That's important to keep in mind. You don't want anything sitting on or at the end of any branch!

I will add the second pine cone holding the loop and wrapping the ornament clockwise.

Around and around


All done

All that's left to do now is to add the ribbon and finish off the bottom of the tree and then I'm done! I can't wait to show you the finished tree!
Wherever you are in your day, I hope your enjoying it.
Wishing you many wonderful creations!

I'll be starting with the gold glittery branches

As mentioned in my previous post I'll be following a pattern, I will continue to do so with all the remaining ornaments. Having said that, do you remember the long gold glittery stem I cut? I'm going to use it now at the top of the tree. You can't ignore the top of the tree so here is where I begin to add some of the goodies.

I begin by sliding the long stem down into the tree keeping it close to the top branch. The top branch I'm referring to is the one that sticks straight up to the sky.

I continue to slide the stem down until I have it as far down as needed.

I then carefully place it up against the top branch and secure it with a wire.

I will now continue to add the remaining gold glittery branches to the rest of the tree.

One by one I will follow the pattern

Now that I've got all the branches attached to the tree


Can't ignore the top of the tree so that is exactly where I will put the group of five. I'm really pleased with how this is all coming together.

Again, following the pattern, I continue to add the remaining groups of cherries.

Turning the tree, I will make sure the back and the sides are all covered and I haven't missed any spots. It's always good to turn your project as your working to make sure you have everything evenly placed. I know I keep repeating myself but if you follow the pattern I promise you will never go wrong.

Now that I've got the entire tree covered and all the cherries have been attached, I will put the final ornaments on.

The pine cones.

Today I want to show you how to add an ornament to your tree. The type of ornament that has a string or cord loop attached to it. Some people like to hang the ornament on the tree as it is, hanging it only by the loop but I have another way. Looking at the picture above, can you see how I have hung the ornament on the branch? It's just slightly over an inch - in from the end.

I will now place my thumb over the loop and holding the loop and the branch together making sure that the loop on the branch doesn't move

I begin to wrap the ornament around the branch clockwise while continuing to hold the loop in place.


When the ornament is tight against the branch, I continue to carefully turn it (if need be) so that the ornament ends up stitting on top of the branch.

See how nicely that sits there? Notice as well, you still see the end of the branch? That's important to keep in mind. You don't want anything sitting on or at the end of any branch!

I will add the second pine cone holding the loop and wrapping the ornament clockwise.

Around and around

I continue to add all the pine cones and here is the last one

All done

All that's left to do now is to add the ribbon and finish off the bottom of the tree and then I'm done! I can't wait to show you the finished tree!
Wherever you are in your day, I hope your enjoying it.
Wishing you many wonderful creations!


This is looking sooooooooo good my little Elfin Friend :) Singing here, 'Deck the halls with boughs of holly, fa, la, la, la, la, la-la-la-la'. Di xxx
ReplyDelete