


You've purchased an artificial tree, now what?
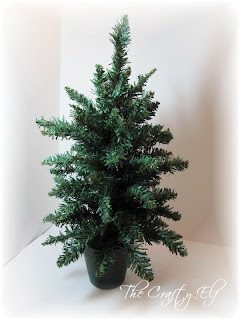
Let's begin with an 18" artificial tree, the one shown in my previous post. Closer to the Holiday Season I will show how to set up an artificial tree, right from the box, stand and all.

Here is our tree.


Once all the branches are now away from the centre of the tree, we can begin to shape our tree. You should have by this time touched every single branch. Keep this in mind when working with an artificial tree, each and every branch and stem should have been touched to ensure that your tree is fluffed properly. This will pay off huge in the end, trust me!

This next part is optional. This is something I was taught many years ago and I've continued to do ever since. If you look at the previous picture of the tree you will notice how long the very top branch is. It's the branch that is sticking straight up to the sky. I've taken the top 1 1/2 inches of the branch (on this particular tree, it will vary depending on height of tree) and folded it down. This serves two purposes. The first, it balances the tree properly for better proportion. The second, when you take your lights (optional) to the top of the tree you can slide the light and wire up under the fold and secure it. It helps to hold and hide the wire all at the same time.
Although I've pretty much placed each branch where I want it, I'm still not too worried about the perfection yet. Our next step is to decorate and that's when the fun begins. I've decided not to light this tree (put lights on it), we will get to that in another post.
Wherever you are in your day, I hope you're enjoying it!
Wishing you many wonderful creations

Let's begin with an 18" artificial tree, the one shown in my previous post. Closer to the Holiday Season I will show how to set up an artificial tree, right from the box, stand and all.

Here is our tree.

Begin with the lowest branches on the your tree.

Gently pull each branch away from the centre of the tree and begin to form the base of the branches as shown. Don't worry about perfection (yet).

Continue to gently pull each and every branch out turning the tree as you work.


This next part is optional. This is something I was taught many years ago and I've continued to do ever since. If you look at the previous picture of the tree you will notice how long the very top branch is. It's the branch that is sticking straight up to the sky. I've taken the top 1 1/2 inches of the branch (on this particular tree, it will vary depending on height of tree) and folded it down. This serves two purposes. The first, it balances the tree properly for better proportion. The second, when you take your lights (optional) to the top of the tree you can slide the light and wire up under the fold and secure it. It helps to hold and hide the wire all at the same time.
Although I've pretty much placed each branch where I want it, I'm still not too worried about the perfection yet. Our next step is to decorate and that's when the fun begins. I've decided not to light this tree (put lights on it), we will get to that in another post.
Wherever you are in your day, I hope you're enjoying it!
Wishing you many wonderful creations


You can't beat a good bit of fluffing.
ReplyDeleteToni xx
Snort, snort - you can't beat a bit of fluffing :)) Nice comment above. Great idea for bending the top bit down too! Di xx
ReplyDelete